How to Make Rails in Minecraft
Make Your Own Minecraft Server
Your own Minecraft server is only 5 minutes away! We support simple one click install for over 3298 unique modpacks.
Minecraft Server Hosting
Need to zoom across your Minecraft world without hoofing it on foot? Say hello to rails! If you’ve ever wanted to ride in style—or just haul tons of loot without sweating it—rails in Minecraft are your go-to. In this guide, we’ll break down how to make rails in Minecraft and set you up with the ultimate travel network. No fluff, just rails, carts, and redstone-powered speed.
What Do Railways Do in Minecraft?
So, what’s the big deal with rails in Minecraft? Basically, they let minecarts travel across your world, saving you time and turning transportation into a thrill ride. You can hop in yourself or use carts to transport gear, mobs, or even villagers (for better or worse).There are different types of rails:
- Standard Rails (aka the basics)
- Powered Rails (for speed boosts)
- Detector and Activator Rails (for fancy redstone shenanigans)
Knowing how to make rails in Minecraft gives you the power to build massive systems, whether you're in creative or survival mode.
Easy Guide: How to Make Rails in Minecraft (Standard Rail)
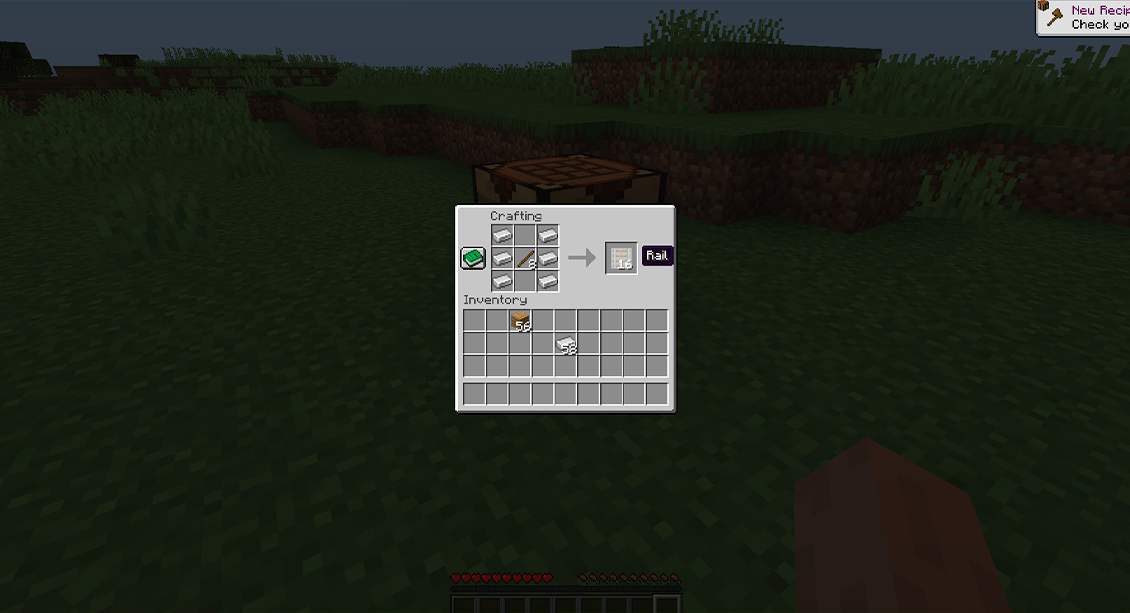
Crafting regular rails is a breeze. Just follow these steps and your first rail system will be up and running before the next creeper hisses.Step 1: Open the Crafting Table
Hit that crafting table. If you don’t have one yet, slap together 4 wooden planks in your inventory grid. Once it’s ready, right-click to open the 3x3 grid.
Step 2: Add Iron Ingots and a Stick
You’ll need:
- 6 Iron Ingots
- 1 Stick
Line up 3 iron ingots on the left column, 3 more on the right, and plop the stick in the center. Boom—your rail recipe is locked in.
Step 3: Take the Rails
Crafting this recipe gives you 16 rails. Not bad, right? Just drag them into your inventory and move on.
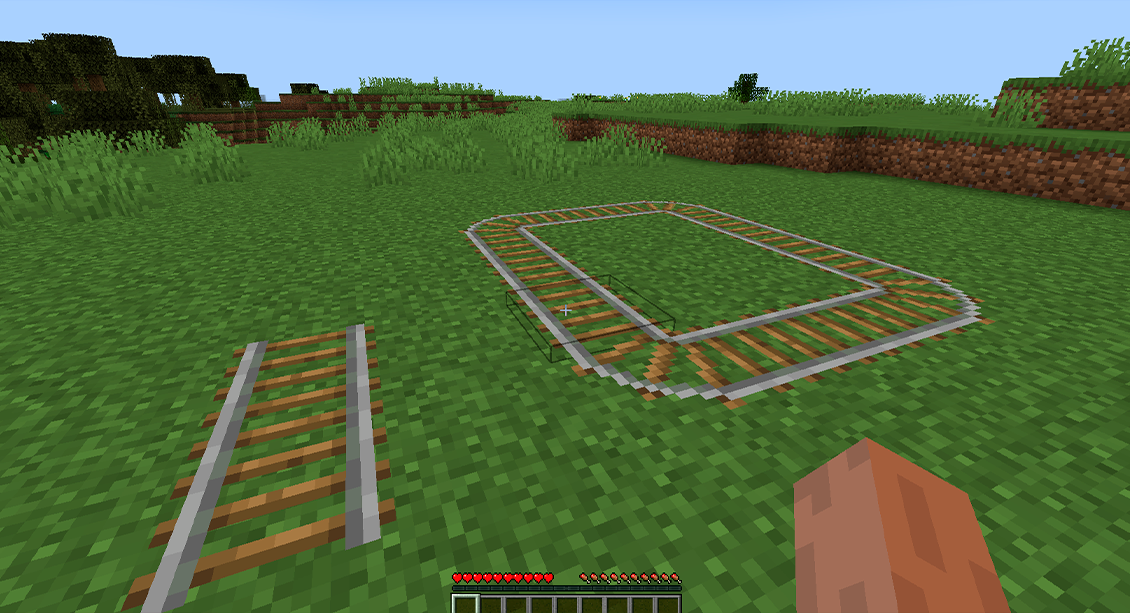
Step 4: Place the Rails
Select the rail, right-click on any solid block like stone or dirt, and it’ll snap into place. Keep laying them down to form your track. Your minecart will follow the path exactly, so get creative!
How to Make Powered Rails in Minecraft (Speed Boosters)
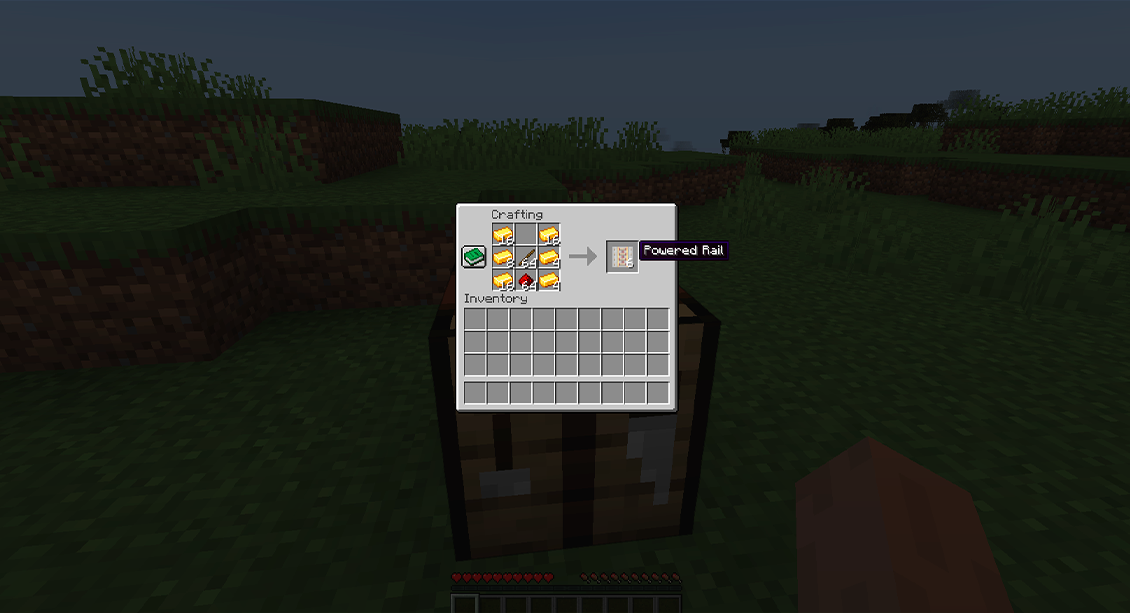
Once your basic track is set, it’s time to kick it up a notch. That’s where powered rails come in. These rails need redstone juice to work, but once powered, they’ll launch your cart like a rocket.What You Need:
- 6 Gold Ingots
- 1 Stick
- 1 Redstone Dust
Crafting Instructions:
- Open the crafting table.
- Place 3 gold ingots in the left column, 3 in the right.
- Stick goes in the center.
- Redstone dust in the bottom-middle square.
That’s it! You’ll get 6 powered rails from this recipe.
Remember: Powered rails won’t work without redstone power. Use redstone torches, blocks, or levers nearby to activate them.
How to Use Rails in Minecraft
Once you’ve crafted them, it’s time to actually lay them down and get rolling.Do Place Rails On:
- Dirt
- Stone
- Wood
- Note blocks
- Redstone lamps
Don’t Place Rails On:
- Glass
- Water
- Leaves
You can make straight tracks or bend them around corners. Add powered rails every 30–40 blocks to keep your minecart moving smoothly. Just drop your cart on the rails, right-click to hop in, and enjoy the ride.
And always, always test your track before a long trip. You don’t want to stop halfway and push the cart manually like a chump.
Bonus Tip: Detector and Activator Rails
Alright, you’ve mastered how to make rails in Minecraft and even built powered rails, but what about the fancy stuff?- Detector Rails: These send a redstone signal when a minecart passes over. Great for lighting up tunnels or opening doors automatically.
- Activator Rails: Used for specific minecart actions—like ejecting passengers or triggering TNT (yikes).
Not necessary for your first rail line, but definitely fun to play with later.
Placing Rails in Minecraft: Build Like a Pro
Placing rails isn’t just plopping them down and hoping for the best. Here’s how to do it right.- Select the rail from your hot bar.
- Right-click the top of a solid block.
- Watch the rails bend and curve automatically to connect.
- Add slopes by placing rails on blocks that increase in height.
Want to go faster? Mix in powered rails strategically. Want style? Try zigzag turns or overwater bridges. The track layout is all yours.
Mistakes to Avoid When Using Rails
Even expert players mess up rails sometimes. Here’s what not to do:- Don’t forget to power powered rails. They’ll just sit there doing nothing.
- Don’t use too many powered rails. You’ll waste gold and your cart may zoom out of control.
- Don’t skip track testing. Missing rails or bad curves can derail your whole trip.
Fix issues early so your rail network stays smooth and stress-free.
Can Rails Be Placed Diagonally Minecraft?
Kind of. Rails don’t place diagonally like blocks, but you can make a zigzag pattern that mimics a diagonal line. It’s perfect for tight areas or hilly terrain. Minecarts still ride smoothly, and it gives your track some extra flair.Wrapping Up
Now you know exactly how to make rails in Minecraft, from basic tracks to high-speed lines with powered rails. Whether you’re delivering goods, racing through tunnels, or just trying to avoid skeletons, crafting rails in Minecraft is a total game-changer.Want a smooth gameplay session? Scalacube’s Minecraft server hosting ensures lag-free gameplay so that your search operations run smoothly. Our dedicated Minecraft hosting supports all the major modpacks, gives you full control over settings, and offers one-click installations. Best of all, we have DDoS protection, high performance, and 24/7 uptime.
FAQs
What materials are needed to create standard Minecraft rails?
You'll need six iron ingots and one stick. To make sixteen rails, place an iron on each side and a stick in the center.
How do I use powered rails in a Minecraft rail system?
Place powered rails along your track every 30–40 blocks. Power them with redstone torches or blocks to keep your minecart going strong.
Can rails be placed on any block in Minecraft?
No! Rails only work on solid blocks like stone, dirt, or wood. Skip glass, water, and leaves—they won’t hold your rails properly.
Make Your Own Minecraft Server
Your own Minecraft server is only 5 minutes away! We support simple one click install for over 3298 unique modpacks.
Start Your Minecraft Server Today!