Hollow Knight Silksong Hunters March Guide
Hunter's March is the first true test in Hollow Knight Silksong. Exit from the early stages is designed to take you through the basics and prepare the March. The foes are more challenging, the platforming segments are more cunning, and the rewards are hidden much more substantially. Opening it up solely requires defeating a guardian boss, and within, you'll face a gauntlet of foes and hazards requiring patience and precision.
While the March is theoretically available as soon as you locate it, certain skills make the process much simpler. The Cling Grip allows you to climb up vertical walls without using trick jumps, and the Drifter's Cloak allows you to ride out gusts of wind that appear later in the zone. Without them, you can still progress, but expect to have to make detours or lose some of the secrets along the way. If you feel like a challenge, then this guide will walk you through it step by step, from Hunter's March entrance gates to the final boss fight way deep within its chapel.
Where is Hunters March Silksong?
Make Your Own game Server
In order to reach the Hunter's March, you must initially drive through The Marrow, a large cave that splits off from early game locations. The fastest route is to travel in by calling the Bell Beast. After it drops you inside, proceed all the way to the lower right corner of the map. You will then come upon a very large pit. Drop down carefully, as the descent is steep, and you’ll land in front of a doorway leading deeper underground.
Cross through, and you’ll immediately be confronted by the gatekeeper of Hunter’s March: Skarrgard. This monstrous sentinel is one of the toughest encounters you’ll have faced so far, and he ensures that players are prepared for what lies ahead.
Defeating Skarrgard
Skarrgard Silksong is threatening not only because of his size, but also because of his high-damage attacks. He slashes with big swings with his massive claws, dashes around the room, and occasionally digs underground and re-emerges with a vicious uppercut. These attacks tend to overwhelm new players early on, but the key to the fight is determining his rhythm. When he burrows, stand off to the side, then move in when he surfaces. His recovery takes long enough that you can get two or three fast hits in. When he jumps, dash under him and punish when he lands. It's better to resist temptation and not try to be overactive here; better to have planned ahead. Patience will keep your health up for the tougher battles later. Once Skarrgard is vanquished, the route to Hunter's March is open, and the adventure proper may begin.
Finding the March
The opening chamber sets the tone: high walls, stray enemies, and several routes to climb higher. If you've acquired the Cling Grip in advance, ascending the left wall is the most straightforward route forward. Otherwise, you'll have to use Hornet's downward needle strike to reflect off the radiant bulbs and onto the ledges higher up.
At the top, an ant soldier waits on the first platform, while a flying ant soon swoops in from the side. Deal with them carefully, as it’s easy to take a stray hit while trying to juggle both. From here, you’ll come across two diverging paths. The left takes you across a spiked pit and brings you back with a freed creature, and the right is richer, a cluster of rosaries. The issue is that this path belongs to an ant general, a more powerful enemy that fights more aggressively. His best safe move is the heavy down slash, but once you can sidestep and punish after he recovers, he's not so bad. Both paths also converge later at a combat arena.
Clearing the Combat Arena
The arena is a proving ground. Several waves of familiar enemies spawn, and while none are particularly new, the amount can quite overwhelm. The best approach is to stay mobile, don't get yourself trapped in a corner, and use the Hornet's fast attacks to weed out groups before you're surrounded. If you've been accumulating Shell Shards beforehand, you can now use them to heal your health and keep up the momentum. With the final wave defeated, the arena doors are opened, and you can push deeper into the March.
Exploring the Shaft
The path soon leads you through a long vertical shaft lined with branching tunnels. This section will appear frightening at first, but move slowly, taking out enemies as you go and keeping an eye out for hidden alcoves.
At the far end, there is a locked bone door to the Deep Docks. It is a convenient shortcut later in the game, but you will require the proper key. About halfway up the shaft, there is a bench on the left-hand side. Be careful, the bench is trapped. There is a decoy wall close by that you can use to avoid the trap mechanism and make the bench safe. Rest here if you need to before continuing.
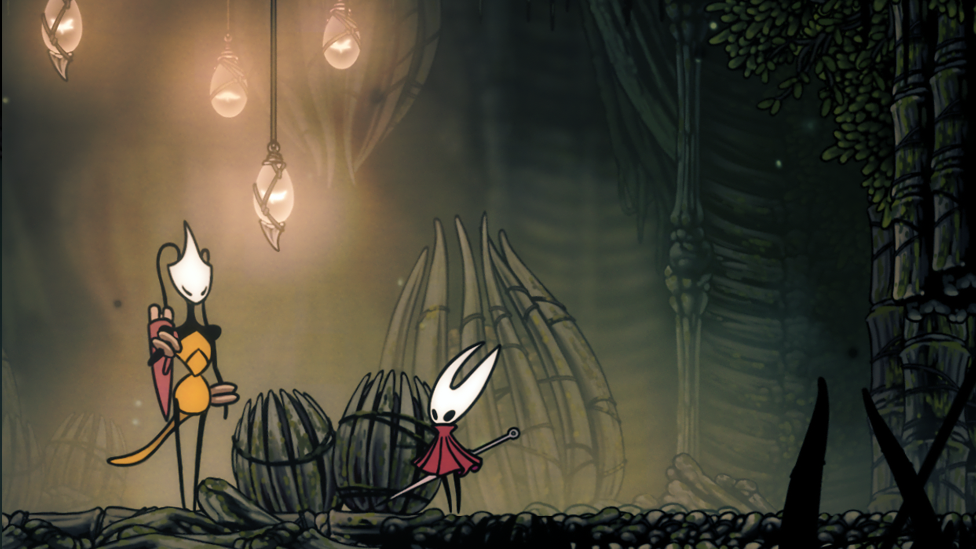
To the right is Gilly, a small shop-owning NPC merchant with some lore to tell. Talking with her adds some flavor to the place and provides some good consumables. Further up, more treasures can be found: Shell Shards on one side, and somewhat further back is Mottled Skarr, a secret vendor selling odd weapons and upgrades.
At the top of the shaft, difficulty again increases. A rematch against Skarrgard is imminent, but this time he has company. Two of the brutes charge together, and their twin-sided pressure is overwhelming. The key to their defeat is spacing; try to lure one into burrowing while keeping the other at a distance. Attack when holes become available and never get greedy. Winning this fight gives you a big cache of rosaries, so the battle is worth it.
Climbing Up to the Chapel
From the top of the shaft, make your way down the right-hand hall and begin climbing up to the Chapel of the Beast. This section relies heavily on your upgrades. With Drifter's Cloak, the wind blows through these rooms, catching you easily in the gusts. Without it, you will need to very carefully bounce across glowing bulbs, maintaining your timing so that you don't fall into spikes below.
Along this climb, you’ll free another trapped bug and receive the Memory Locket, a collectible item tied to the area’s lore. Be prepared for ambushes here, as cages burst open to unleash new enemy types. A floating insect armed with scissor-like blades darts quickly, but its attacks are easy to parry. Another creature, encased in daggers, patrols the floors and requires patience to dismantle without taking damage from spikes. Later, you'll get another bone door that creates a shortcut to the chapel entrance. It's worth it if you die to the boss since it doesn't make you climb up the entire distance.
Boss Battle – The Savage Beastfly
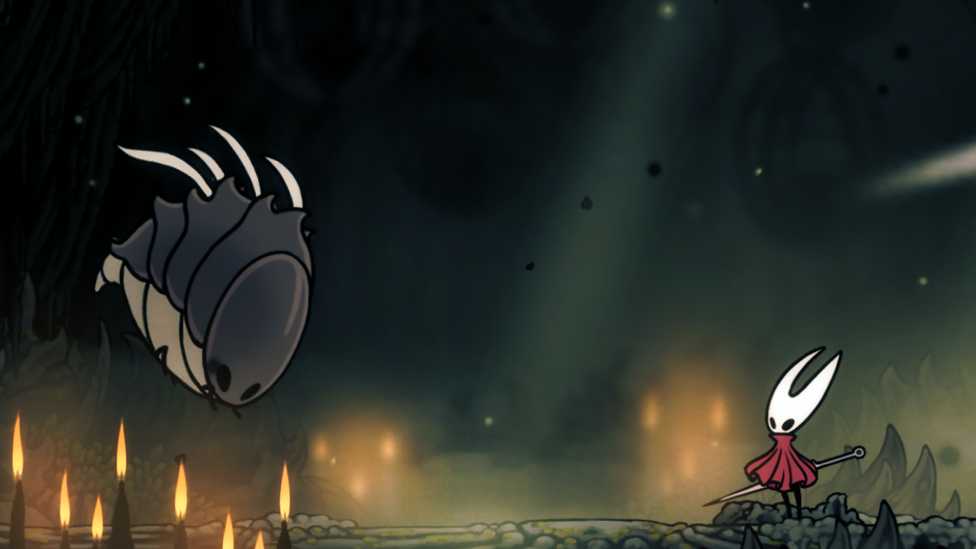
At the heart of the chapel, the final challenge of Hunter’s March awaits: the Savage Beastfly. This towering insect is the true boss of the region, and it embodies the chaotic speed of the enemies you’ve faced so far.
The Beastfly's primary attack is to sweep dive, racing into the room with little warning. If you can keep your cool and keep your dashing in check, you can sidestep the blow and strike back with quick shots before it goes to attack once more. At intervals, it hovers to execute a sequence of lunges, and you must remain on the move and not get caught in a static position. The secret is never to stay in one place long; movement is your best defense. The fight is intense, but once you have learned its rhythm, the Beastfly can be anticipated. Every dodge creates an opening, and every opening brings you closer to victory. When it finally falls, a nearby husk will drop the Crest of the Beast, your reward for passing this challenging trial.
Conclusion
Hunter's March is not just another part of Silksong. It is an initiation, a trial that tests your combat skills, platforming precision, and resource management under pressure when it matters most. From the first fight against Skarrgard to the discovery of hidden vendors and the final fight against the Savage Beastfly, the March is chock-full of memorable fights and reward-the-effort payouts.
By the time you emerge with Crest of the Beast in possession, you will be stronger, better trained, and bolder to tackle dangers still to come. Do not rush, explore all corners and crevices, and do not shy away from retreating and reorganizing when needed. The fights are against the grain, but the victories are all the sweeter for it.