How to Farm in 7 Days to Die

Make Your Own game Server
This is one of the principal surviving skills: to survive by creating food and required materials for use. This is how to go about your farm startup process and grow vegetables to survive according to the step-by-step guidelines.
But first, check out this awesome 7 Days to Die MP Server Hosting!
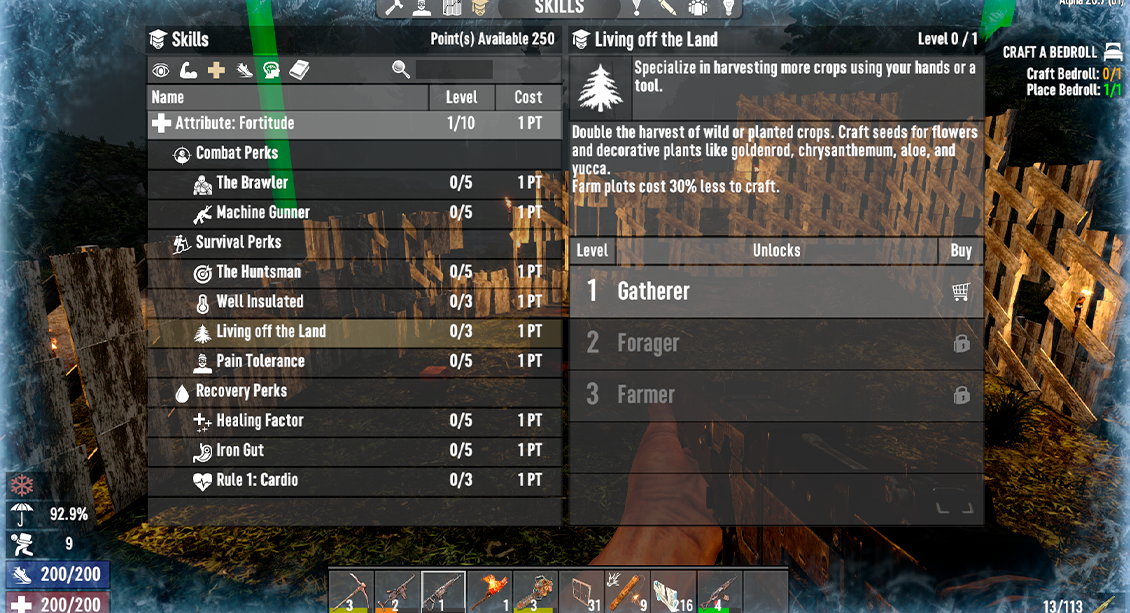
Activating ‘Living off the Land’ Perk
Though not a necessity, unlocking the "Living off the Land" ability goes a long way in enhancing your farming ability. This ability provides the character with quite several farming abilities, for example, an increase in the crops that you receive from planting crops, and a reduction in the time crops take to reach maturity.The Living Off The Land is itself under the Fortitude skill tree, whereby you are meant to spend skill points before you can unlock it. Consider pouring skills into that if you want to find your farming experience both good and productive.
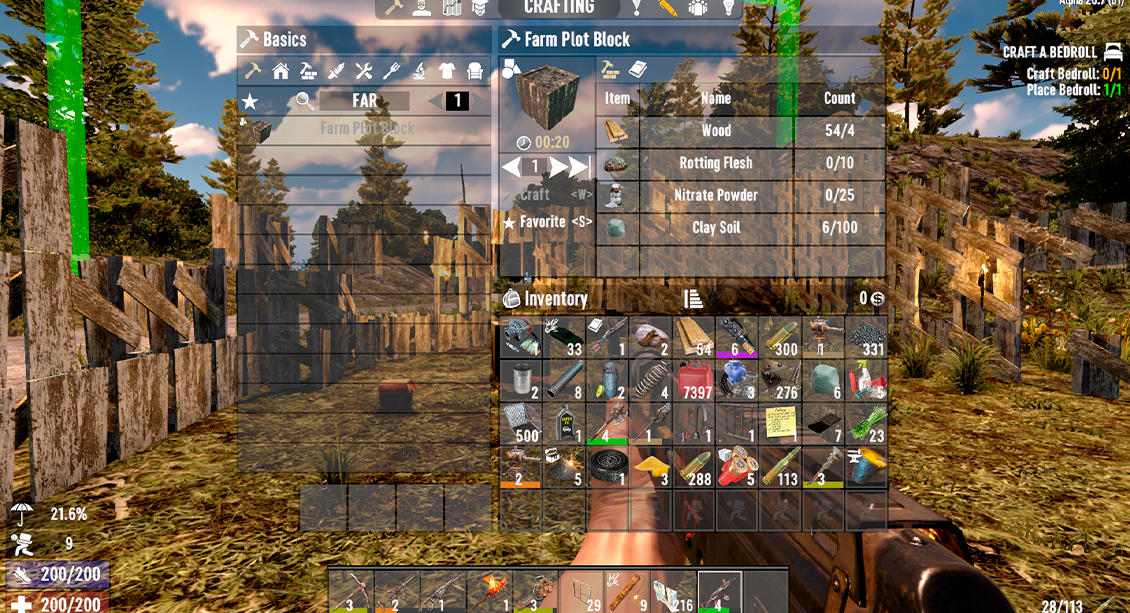
Crafting and Placing a Farm Plot
You must first create a farm plot before you can start farming. To get started, take these actions:- Access your inventory: To access the inventory, press the respective key, which in most cases is "I" by default.
- Open the crafting menu: Locate the crafting menu in your inventory then click to open it. In this menu, you can craft anything you want to craft.
- Create a farm estimate. Look through the crafting to find the farm plot recipes. If you have the supplies, you can build one using a 4x4 farm plot.
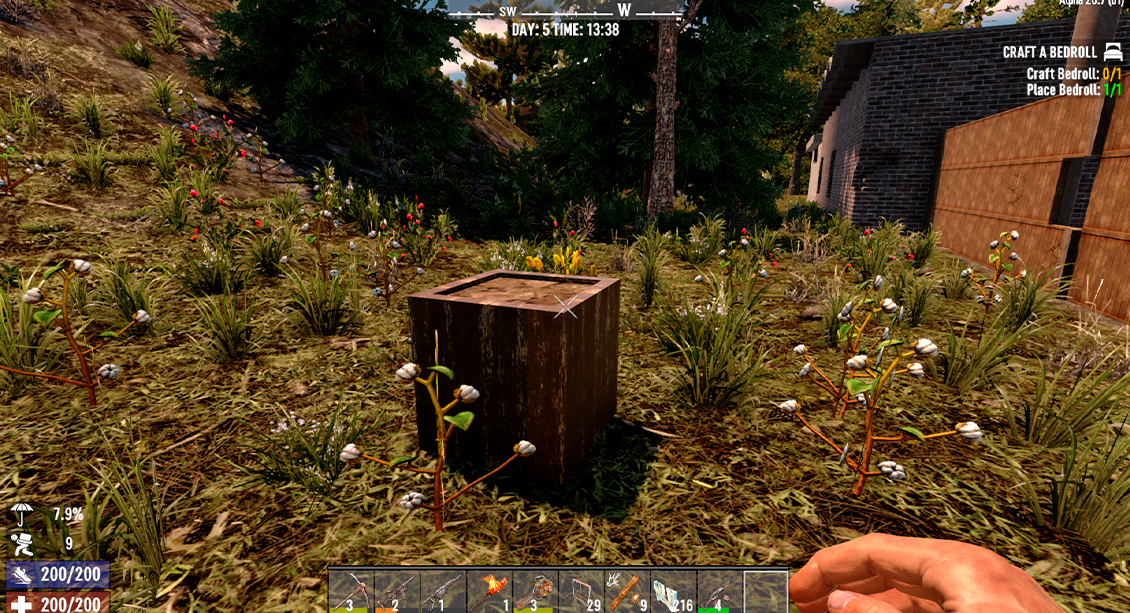
- Plant the agricultural plot. Afterward, step out of the crafting menu and select "Farm Plot." From your inventory, choose the right position and place it. Make sure valid space is there for growing crops.
The Process of Planting Seeds
It's time to plant your seeds now that your farm area is prepared. To plant your crops, adhere to these steps:- Get Seeds: You will want to purchase different seeds from traders or, through exploring the world, get some. Getting different types is possible while choosing your crops.
- Get your toolbar ready: Put the seeds on your toolbar so you can easily access them when planting.
- Choose your seeds: To choose the seeds from your toolbar, press the corresponding key (often a number key).
- Sowing the Seed: Right-click on the farm plot with the current selection of seeds from the scroll to sow the one that is picked. One seed will be sown on the right click of the plot.
The Growth Cycle
In 7 Days to Die, cultivated plants go through a three-stage growth cycle: seeding, growing, and fully developed. What you need know about each level is as follows:- Transplantation: After germination, nursery beds are put at a favorable spacing for an easy time of management to take the crop to the next level. This stage comes when the crop has developed and the roots and leaves have developed for the outside soil environment.
- Stage of growth: The height of the plants keeps rising day by day, and the number of leaves will increase with time. This will show that the plant's growth cycle is occurring.
- Fully grown stage: This will vary with the different types of crops as the days required for the maximal maturity. In this stage, the plants should have ideally developed and are ready for harvesting.
Lighting
Perfect lighting is what will be required for the crops to grow well. In 7 Days to Die, most of the plants require natural light to grow. Ensure that your agricultural plot is located in an area prevalent with natural sunlight. You can also make use of blocks with light opacity, for example, glass blocks, so that light can reach the crops. OFFICIAL Your crop output will be maximized and healthy plant growth will be ensured by proper illumination.Harvesting
It's time to harvest the plants after they are completely developed so you may enjoy the fruits of your labor. To harvest your crops, take the following actions:- Engage the vegetation - Keyed interaction with fully-grown plants, normally "E" by default.
- Collect the food: With this, a person will just be able to visit even a single crop and click on the plants to be able to experience the associated resources or products. It might be fruits or vegetables, things of great value, and others.
- Store all the food, or eat it. Choose what to store for later use as food or simply eat from whatever should be available in the game in case you feel hungry, to ensure that your character's hunger and thirst are satisfied. This way, sustainability in food is still maintained.
Can I farm indoors or underground in 7 Days to Die?
Yes, it is feasible to farm underground or indoors in 7 Days to Die by constructing a synthetic habitat that meets the requirements for plant development. Here is how to go about it:
- Lighting: All agricultural plants require natural sunlight for growth to take place accordingly, so make sure you place artificial sources of sunlight, for example, torches, candles, or electric lights corresponding to the sun distribution at all indoor or underground sizes of the agricultural area. Scatter the light sources correctly, in the right way, to maintain a good area of lighting.
- Irrigation: Facility to support the growth of the crops Irrigation is always important in the growing up process of the plants. Water jugs or even buckets can be placed for the crops to get wet. It may be comprised of a rain collector which is made for directing rainwater onto the roof and down to a rain barrel and then further utilizing that rainwater with a watering can or a bucket to sprinkle your plants.
- On temperature, in cold-climate conditions, campfires or any other means of heating the plant may need to be undertaken to keep the conditions right in cold climates. Consider using blowers for air circulation or cooling ways by putting the ice cubes in hot climates.
- Fertilizer: There would be the need to apply a certain level of fertilizer to the indoor or underground soils in a stay to make the level of nutrients located within the soil. Different types of organic matter can be mixed with the soil to be nourished, such as animal waste, decayed flesh, or a few of the typefertilizerslizer prepared out of bones and rotten flesh.
Correct him; he thinks one can farm in the right way inside, not outside, simply by creating an environment that avails proper lighting, irrigation, temperature, and such, just as in the game 7 Days to Die.
How long does it take for crops to grow in 7 Days to Die?
In 7 Days to Die, crops take time to reach maturity after a set number of 24-hour cycles. Each crop has a different growing time, and different factors between game settings and knowledge level with farming add up to affect how long one crop will take to grow. Here's a general schedule of when several popular crops grow:
- Corn: Corn has a somewhat lengthy growth cycle and matures fully after about three game days.
- Blueberries: Blueberry plants often take two in-game days to reach full growth due to their slower development cycle.
- Potatoes: Once the plants have reached maturity, which takes around two game days, potatoes can be harvested.
- Yucca: Yucca plants grow quickly and typically reach maturity in just one game day.
These crops take between 2-3 years in real-life time, but these are rough estimates and will vary according to your ability to make money from your farm, the settings of your game, and the various mods you've got installed. Watch the crop grow as it develops from one growth stage to the next.
Can I automate the farming process in 7 Days to Die?
There is no automatic function from the game 7 Days to Die. There is only one method able to do something: applying a few tactics and everything can be done quickly and in an organized manner. This is how you can do it:
- Irrigation System: Automatically irrigate your crops in just one attempt through this irrigation system that is designed with water blocks, pipelines, and buckets. When you connect your source of water to your farm plots, you can do irrigation of plants completely on this at any time without effort.
- Crop Rotation: Apply the adoption of a crop rotation plan for better productivity and bringing increase in production. Crop rotation refers to crop production activity of different types or varieties of crops in the same plot each planting season and repeating the undertaking before returning to the same crop type or variety on that plot. This shall reduce the susceptibility of the plant to diseases and pests and therefore prevent soil exhaustion.
- Farming Automation Mods: Those evened up with modifying an approach in the game contain a range from the straight version that adds a driving path to the implements used to plant most of the collaborations or mean support for an optimal harvesting setup in most cases, watering, seeing that each kind of crop typically has a different optimal water level.